Can setting up a DMARC record really be that easy? Absolutely! Remember, it’s only one line of text. Honestly, it’ll probably take you more time finding your DNS and corporate email administrators, than creating a DMARC record.
If you’re interested in creating a DMARC record, chances are you already know the prerequisites. Just in case, here’s a reminder:
- Verify Domain Alignment (aka Identifier Alignment) – Open the email headers from the emails you send. Identify the (sub)domain listed in the following email headers:
- Return Path:/Mail-From:/Envelope From:
- From:
- DKIM-Signature – look for the “d=” tag
Are they identical? If so, then your domains are aligned and you’ll be able to instruct the Mailbox Providers to reject any emails that are pretending to be sent from your brand. If not, you’re out of luck, but at least you’ll still be able to receive reports about these emails.
- Authenticate your emails with DKIM and a SPF compliant Sender ID record.
Now you’re ready to begin.
- Create email accounts – Through DMARC, you’ll be able to receive aggregate and daily spoofed/phishing reports. So, make sure you have email accounts to accept it. You may want to use two separate accounts, as you could get inundated with the daily reports, but it’s up to you on how you want to filter your emails.
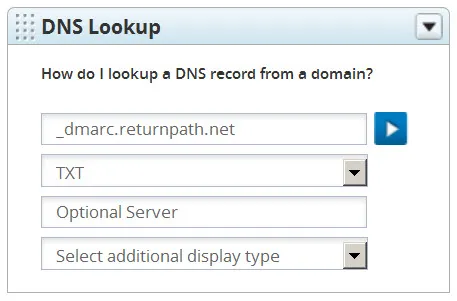
- Learn from others – Sometimes the best way to learn is to see at what other people have done. So, why not lookup the DMARC policy of your favorite sender? For example, if you want to lookup Return Path’s DMARC record, go to DNSStuff and fill out the following:
Here’s what you’ll get:
| _dmarc.returnpath.net. | TXT | IN | 600 | 7ms | “v=DMARC1; p=none; rua=mailto:[email protected]; ruf=mailto:[email protected]; rf=afrf; pct=100” |
- Learn the DMARC tags – There are numerous DMARC tags available, but you don’t have to use them all. In fact, I recommend keeping it simple. Focus on the v, p, rua, and ruf tags.
- Start in Monitor mode – Here’s a very simply and recommended way to start with DMARC. Specify the version, which is fixed. Set the policy tag to “none”, which means that the Mailbox Provider won’t do anything with the spoofed/phished emails like quarantining or rejecting it. Request to receive the daily aggregate reports (rua) from the Mailbox Providers by specifying your email address. Your SPF failing mechanism should also match, so set it to reflect a soft fail (~all). Add this text record to your DNS zone file for your sending domain.
“v=DMARC1; p=none; rua=mailto:[email protected]”
You can also request to receive a copy of the actual spoofed/phished email by listing the ruf tag. You can do this now or later when you’ve had a chance to get comfortable with the RUA reports. Note: Gmail doesn’t send the ruf reports.
“v=DMARC1; p=none; rua=mailto:[email protected]; ruf=mailto:[email protected]”
- Quarantine mode – We’re all human and sometimes we make mistakes. Through the reports you receive, you might discover that you forgot to authenticate an email campaign that’s beiing deployed from a third party. If something like that happens, simply authenticate it. No more anomalies? Great, then you’re ready for the next step. Tell the Mailbox Providers to quarantine those spoofed/phished emails into the spam/bulk folder.
“v=DMARC1; p=quarantine; rua=mailto:[email protected]; ruf=mailto:[email protected]”
Through other DMARC tags you can do other neat tricks, like quarantining only a percentage of those spoofed/phished emails.
- Reject – When you’ve graduated to the final stage, tell the Mailbox Providers to reject/block those spoofed/phished emails. Your SPF failing mechanism should be set to reflect a hard fail (-all).
“v=DMARC1; p=reject; rua=mailto:[email protected]; ruf=mailto:[email protected]”
Wasn’t that simple? Congratulations, you are about to join the elite group of top senders that have already published a DMARC policy. Let me know how it goes.
Check out our guide on how to interpret DMARC records to take your email security to the next level.
